
API Documentation with Spring Boot & Swagger 2
December 7, 2022API Documentation with Spring Boot & Swagger 2
Designing and implementing a RESTful API layer with Spring Boot is important but there is another important point with this approach which is the documentation of this API layer. As there is no contract is present for RESTful services like there is for SOAP services, documentation of RESTful services becomes crucial from development perspective.
This RESTful API documentation should be structured for all parties involved in the implementation. It should be easy to be read and understood and it should be informative enough to make APIs clear for everyone.
Throughout this article, I will cover Swagger 2 implementation with Spring Boot with an public example from my GitHub account. I will mention about the details how to make a structured API documentation with example code lines. Also, all code base can be found in my public repo.
What is Swagger 2?
Swagger 2 is an open-sourced project for documenting RESTful APIs. HTML, CSS, JS assets are used to create Swagger compliant API documentation dynamically. These created documents can be viewed by Swagger UI. This methodology based on Open API specification.
SpringFox library is a popular one for Spring Boot applications and I will use this library within my example.
For more information related to Swagger, you can check Swagger home page.
Now, let’s go deep dive with my example.
General Info About Example Code Base
You can also check from README file but I will use;
- Spring Boot 2.5.2
- Java 11
- Maven 3.8.1
- SpringFox 3.0.0
- MongoDB
- MapStruct
- Lombok
with this example.
I will not only give a Swagger UI documentation example. You can also find the related entity, DTO, mapper, repository, controller, service implementation. I have used a customer Mongo collection and I have implemented related all related classes including GET, POST, PATCH, PUT, DELETE methods in API layer.
I will give related code snippets during the article but you can find the whole code base in my-swager-ui-example public GitHub repo as I mentioned before.
Adding SpringFox Dependency
First thing is to add our SpringFox dependency in our application. Below code snippet can be used in the pom.xml in order to add SpringFox dependency.
Please, check the gist for adding SpringFox library dependency.
You do not need to any other dependency with SpringFox version 3.0.0.
Configuring Swagger 2
After adding our dependency, we can start configuring our Swagger 2 within our application.
First, let’s create a configuration class called SwaggerConfig which extends WebMvcConfigurationSupport class annotated with @EnableWebMvc. We need to use @EnableSwagger2 annotation to use the Swagger config support.
With ApiInfoBuilder class, our main API information is implemented with title, version, license, contact information. This apiInfo can be used within implemented Docket beans in order to display the information in Swagger UI.
Please, check the gist for configuring API Info Builder for Swagger UI.
Then, we need to define a Docket bean in our SwaggerConfig in order to configure Swagger2. We can have one or we can have more according to grouping. I show with different groups. The first one includes all APIs, the second includes only APIs serving ending with /customer* URI and the last includes only APIs serving ending with /refCustomer*.
Please, check the gist for configuring the views in Swagger UI according to API end-points.
Each Docket is grouped by a different group name and path for each Docket is selected with path selector method, paths. For the all APIs, path selector is used as any in order to select all provided APIs where the other two are implemented with path selector regex to distinguish API grouping.
Now, lets override resources from WebMvcConfigurationSupport in order to serve our Swagger UI from a specific address.
Please, check the gist for adding Resource Handlers for Swagger UI.
Below screenshot shows how the Swagger UI page is displayed after running our application. Docket groupings are displayed on the right top part and API info is displayed on the left top part of the page.
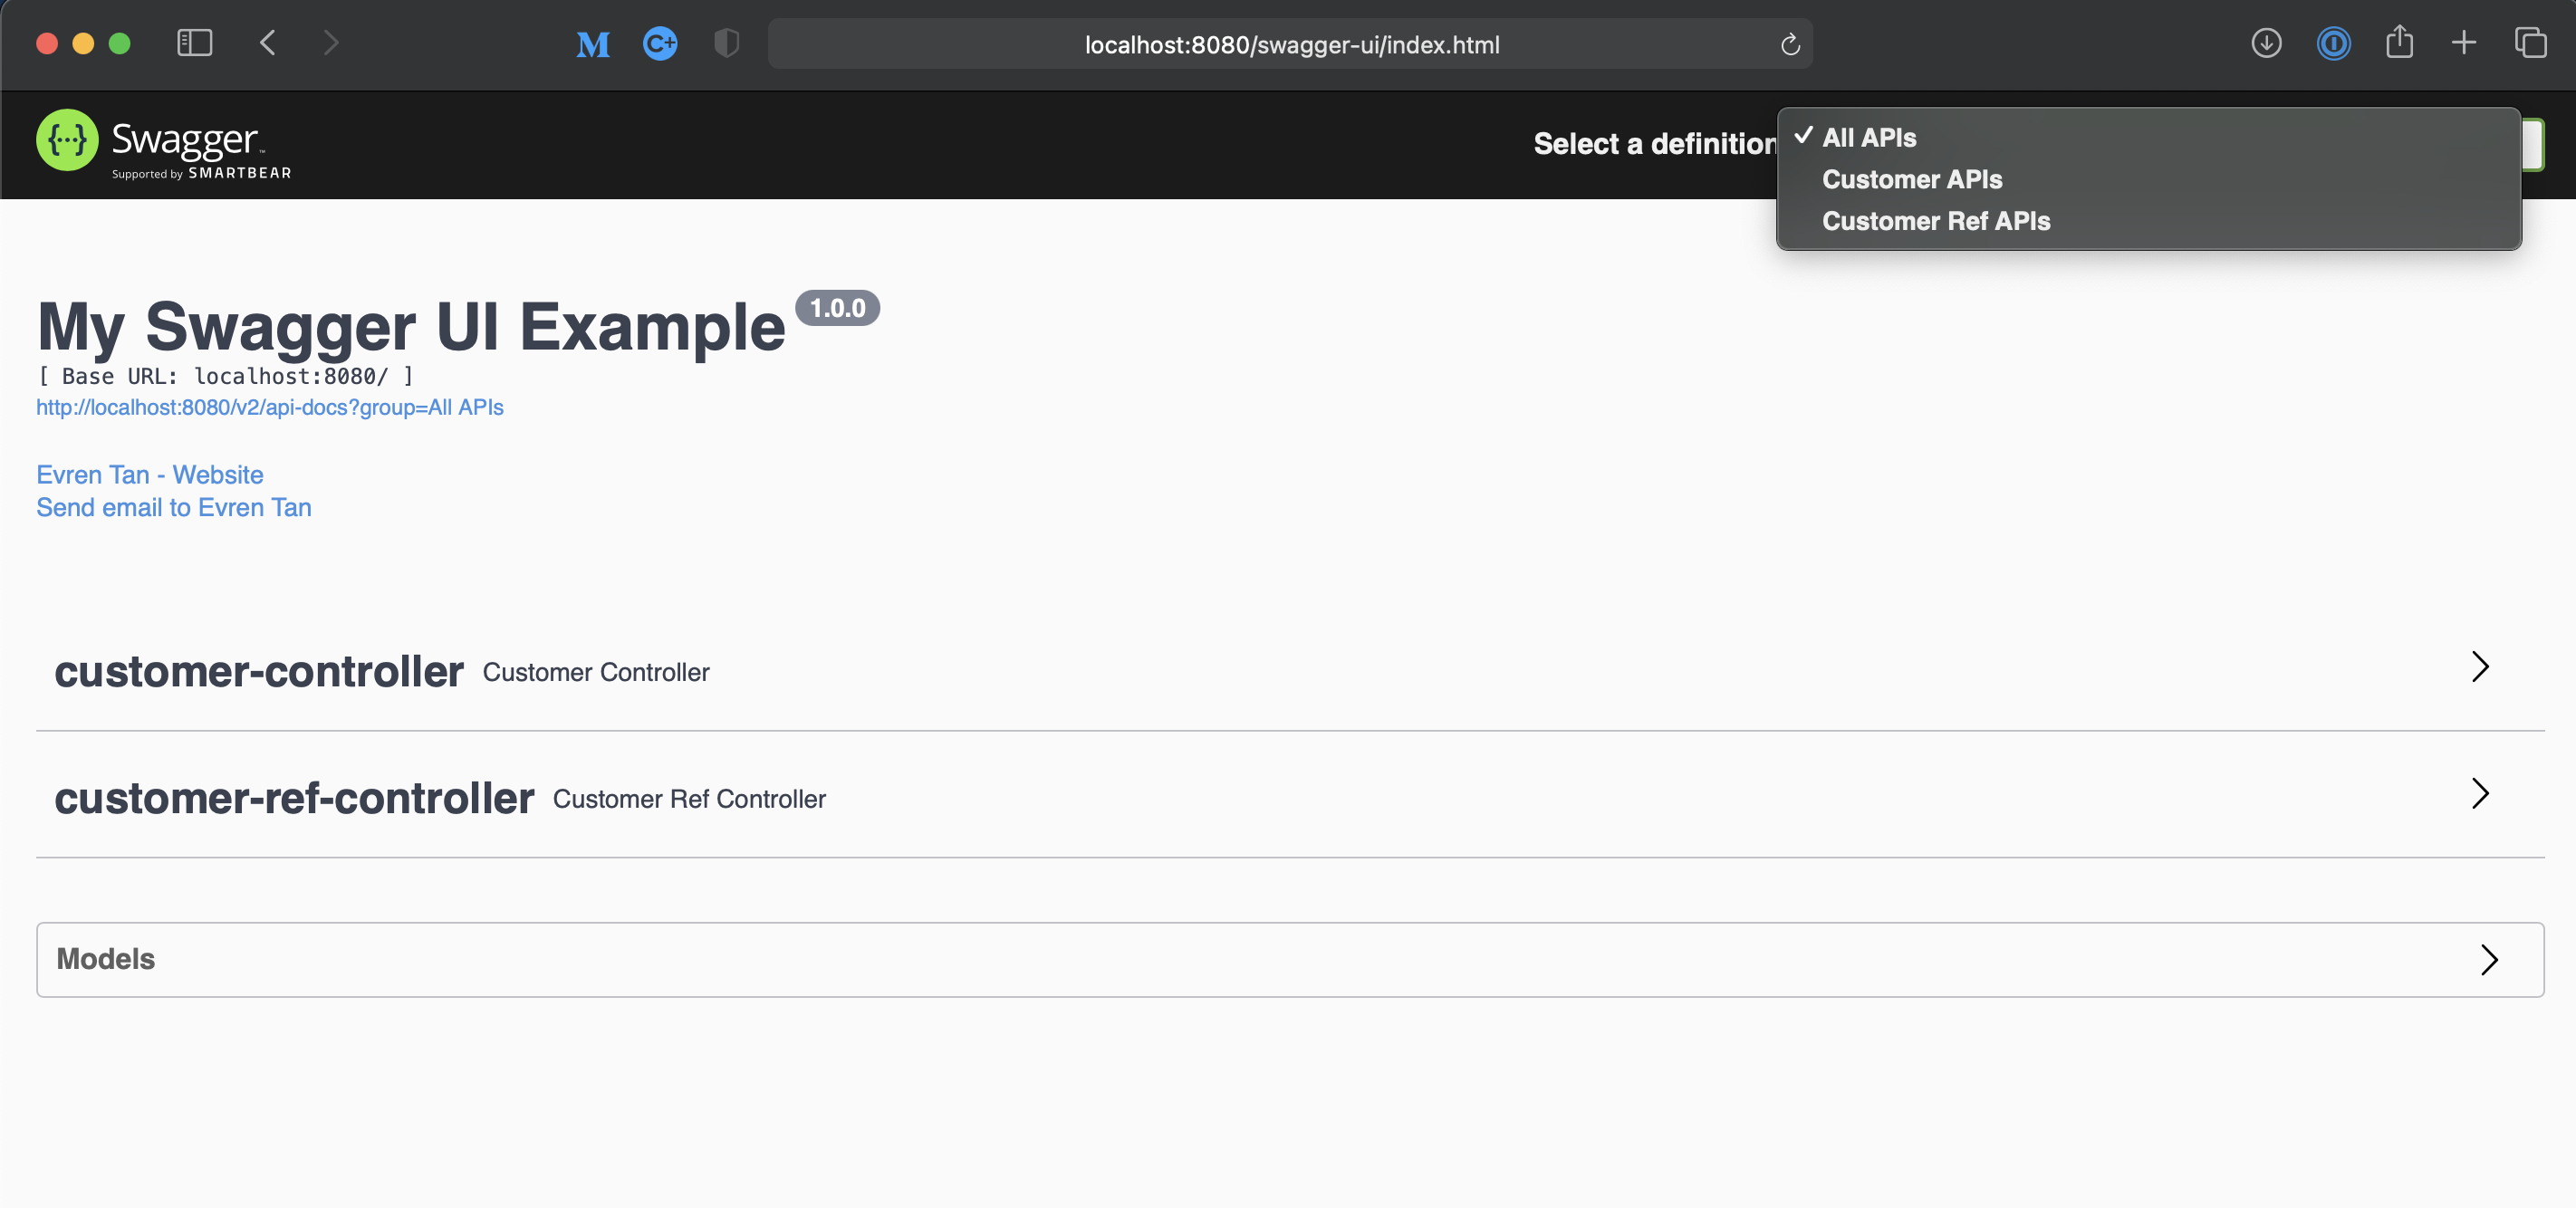
If you choose different Docket definitions/groups, only related controller classes and APIs will be displayed.
You can reach this Swagger UI page from http://localhost:8080/swagger-ui/index.html link after running your application.
Also, swagger documentation in json format can be reached from http://localhost:8080/v2/api-docs link. It will give a json format documentation to be used in Swagger UI.
Useful Swagger 2 Annotations
After successfully running our Swagger UI, let’s move to Swagger 2 annotations which are very useful for our Swagger documentation. I will give examples for our controller class for general API documentation and for our DTO classed for the model documentation.
@Api Annotation
@Api annotation is used in the controller class to describe our controller API for the Swagger UI documentation.
Please, check the gist to see how to use @Api annotation.
@ApiOperation Annotation
@ApiOperation is used to describe a specific end-point within the controller for the Swagger UI documentation.
Please, check the gist to see how to use @ApiOperation annotation.
@ApiResponses & @ApiResponse Annotations
@ApiResponse is used to explicitly define the response for the Swagger UI documentation.
@ApiResponses is used to group @ApiResponse annotations.
Please, check the gist to see how to use @ApiResponses & ApiResponse annotations.
@ApiModelProperty Annotation
@ApiModelProperty annotation is used to describe the properties in a model for the Swagger UI documentation.
Please, check the gist to see how to use @ApiModelPropery annotation.
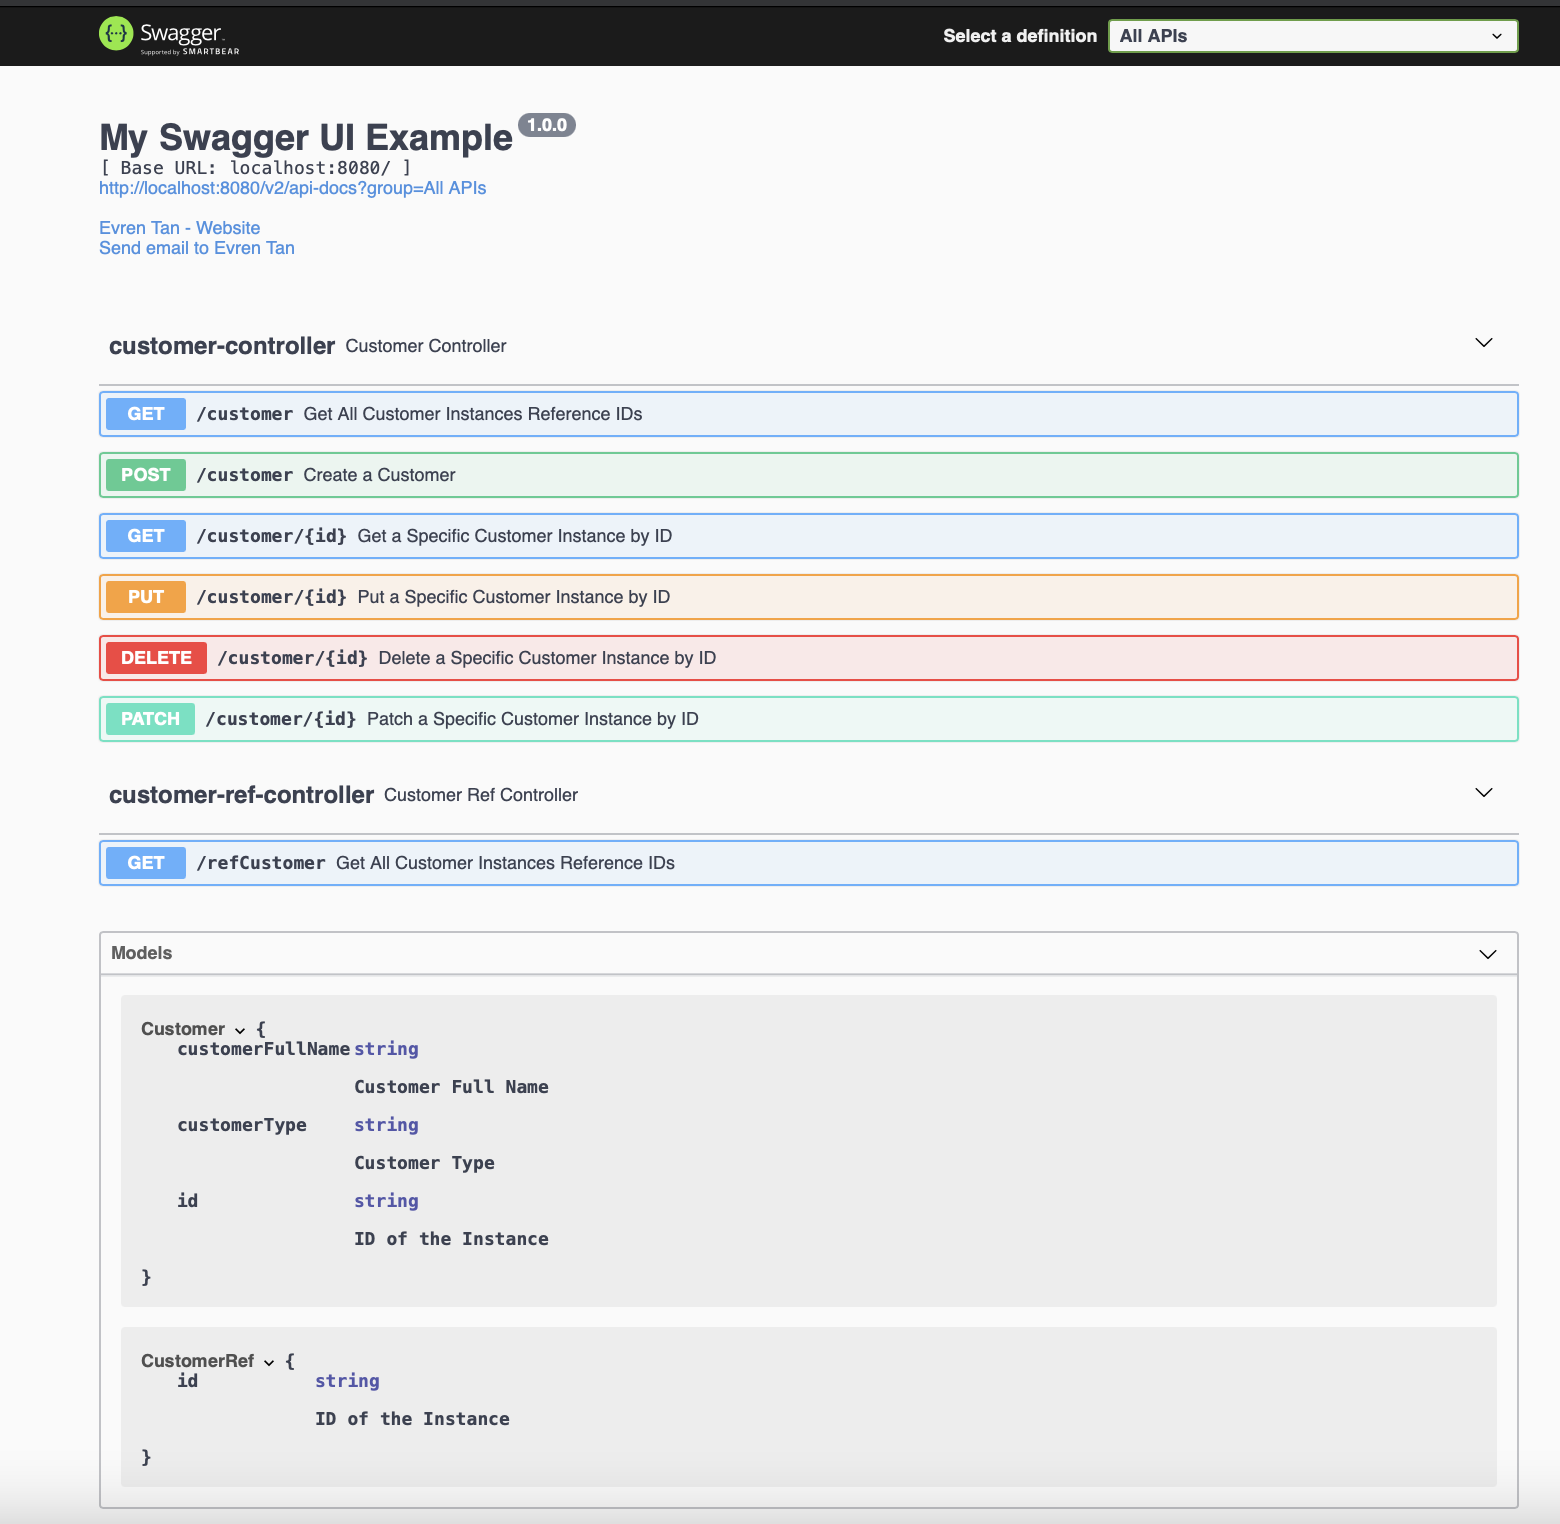
To use these annotations make our Swagger UI documentation more readable & understandable. Below is a screenshot of the final Swagger UI documentation from my example.
To Sum Up
Designing & implementation API layers are crucial but documentation is also an important factor in our applications.
Documentation provides sustainability for our code base & application. Swagger UI Documentation is very efficient & easy-to-use to provide that sustainability functionality for our API documentation requirements.
You can reach the example code base from my-swagger-ui-example public GitHub repo.
Embedded content: https://github.com/evrentan/my-swagger-ui-example